> ## Documentation Index
> Fetch the complete documentation index at: https://wb-21fd5541-docs-2989.mintlify.site/llms.txt
> Use this file to discover all available pages before exploring further.
# コードから評価データをログする
> Python および TypeScript のコードから評価データを柔軟かつ段階的にログする方法
このガイドでは、`EvaluationLogger` を使用して既存の Python または TypeScript のコードから予測とスコアを記録し、完全なデータセットや scorer 一式を最初に定義しなくても Weave でモデル性能を評価する方法を説明します。データセットや scorer を最初に定義していない場合、または workflow の実行中に評価データを段階的にログする必要がある場合は、この方法を使用してください。
あらかじめ定義した `Dataset` と `Scorer` オブジェクトの list が必要な標準の `Evaluation` オブジェクトとは異なり、`EvaluationLogger` では個々の予測とそれに関連するスコアを、利用可能になった時点で段階的にログできます。
**より構造化された評価をご希望ですか?**
事前定義されたデータセットと scorer を備えた、より定型的な評価フレームワークを使用したい場合は、[標準 Evaluation フレームワーク](../core-types/evaluations)を参照してください。
`EvaluationLogger` は柔軟性を重視している一方、標準フレームワークは構造とガイダンスを提供します。
## 基本的なワークフロー
以下の手順に従うと、予測ごとのスコアと、Weave UI で確認できる集計済みサマリーを含む完全な評価が Weave に記録されます。
1. *ロガーを初期化する:* `EvaluationLogger` のインスタンスを作成し、必要に応じて `model` と `dataset` に関するメタデータを指定します。省略した場合、Weave はデフォルトを使用します。
LLM Call (たとえば OpenAI) のトークン使用量とコストを記録するには、LLMを呼び出す前に `EvaluationLogger` を初期化してください。
先にLLMを呼び出してから予測をログしても、Weave はトークンとコストのデータを取得しません。
2. *予測をログする:* システムの各入力/出力ペアに対して `log_prediction()` を呼び出します。
3. *スコアをログする:* 返された `ScoreLogger` を使用して、その予測に対する `log_score()` を呼び出します。1つの予測に対して複数のスコアをログできます。
4. *予測を完了する:* 予測を確定するため、スコアをログしたら必ず `finish()` を呼び出します。
5. *サマリーをログする:* すべての予測の処理が完了したら、`log_summary()` を呼び出してスコアを集計し、必要に応じてカスタムメトリクスを追加します。
予測に対して `finish()` を呼び出した後は、その予測にそれ以上スコアをログできません。
このワークフローを示す Python の例については、[基本例](#basic-example)を参照してください。出力とすべてのスコアが一度に利用可能な場合、Python ユーザーは [`log_example()`](#simplified-logging-with-log_example) を使用して手順 2~4 を 1 回の呼び出しにまとめることができます。
## 基本的な例
次の例は、既存のコードにインラインで `EvaluationLogger` を使用して予測とスコアをログする方法を示しています。\[YOUR-TEAM]/\[YOUR-PROJECT] を W\&B entity と project に置き換えてください。
`user_model` 関数を定義し、入力のリストに適用します。各例について:
* 入力と出力は `log_prediction` を使用してログします。
* 正確性スコア (`correctness_score`) は `log_score` を使ってログします。
* `finish()` はその予測のログ記録を完了します。
最後に、`log_summary` は集計メトリクスを記録し、Weave での自動スコア要約をトリガーします。
```python lines theme={null}
import weave
from openai import OpenAI
from weave import EvaluationLogger
weave.init('[YOUR-TEAM]/[YOUR-PROJECT]')
# トークントラッキングを確実にするため、モデルを呼び出す前に EvaluationLogger を初期化する
eval_logger = EvaluationLogger(
model="my_model",
dataset="my_dataset"
)
# 入力データの例(任意のデータ構造を使用できます)
eval_samples = [
{'inputs': {'a': 1, 'b': 2}, 'expected': 3},
{'inputs': {'a': 2, 'b': 3}, 'expected': 5},
{'inputs': {'a': 3, 'b': 4}, 'expected': 7},
]
# OpenAI を使用したモデルロジックの例
@weave.op
def user_model(a: int, b: int) -> int:
oai = OpenAI()
response = oai.chat.completions.create(
messages=[{"role": "user", "content": f"What is {a}+{b}?"}],
model="gpt-4o-mini"
)
# レスポンスを何らかの方法で使用する(ここでは簡略化のため a + b を返すだけ)
return a + b
# 例を反復処理し、予測してログする
for sample in eval_samples:
inputs = sample["inputs"]
model_output = user_model(**inputs) # 入力を kwargs として渡す
# 予測の入力と出力をログする
prediction = eval_logger.log_prediction(
inputs=inputs,
output=model_output
)
# この予測のスコアを計算してログする
expected = sample["expected"]
correctness_score = model_output == expected
prediction.log_score(
scorer="correctness", # スコアラーのシンプルな文字列名
score=correctness_score
)
# この特定の予測のログ記録を完了する
prediction.finish()
# 評価全体の最終サマリーをログする。
# Weave は上記でログした 'correctness' スコアを自動集計する。
summary_stats = {"subjective_overall_score": 0.8}
eval_logger.log_summary(summary_stats)
print("Evaluation logging complete. View results in the Weave UI.")
```
TypeScript SDK には、2 つの API パターンがあります。
* **Fire-and-forget API (ほとんどのケースで推奨)**: 同期的かつノンブロッキングにログするには、`await` を付けずに `logPrediction()` を使用します。
* **Awaitable API**: 続行する前に処理の完了を確実にしたい場合は、`await` とともに `logPredictionAsync()` を使用します。
以下のような場合は **fire-and-forget** を推奨します。
* **高スループット**: 各ログ処理の完了を待たずに、複数の予測を並列で処理できます。
* **コード変更を最小限に抑えられる**: 既存の async/await フローを組み替えることなく、評価ログを追加できます。
* **シンプル**: ほとんどの評価シナリオで、定型コードが少なく、構文もすっきりします。
fire-and-forget パターンが安全なのは、`logSummary()` が結果を集計する前に、保留中のすべての処理が完了するまで自動的に待機するためです。
次の例では、fire-and-forget パターンを使ってモデルの予測を評価します。評価ロガーをセットアップし、3 つのテストサンプルでモデルを実行した後、`await` を使わずに予測をログします。
```typescript twoslash lines {36,50} theme={null}
// @noErrors
import weave, {EvaluationLogger} from 'weave';
import OpenAI from 'openai';
await weave.init('[YOUR-TEAM]/[YOUR-PROJECT]');
// モデルを呼び出す前に EvaluationLogger を初期化してトークントラッキングを確実にする
const evalLogger = new EvaluationLogger({
name: 'my-eval',
model: 'my_model',
dataset: 'my_dataset'
});
// 入力データの例
const evalSamples = [
{inputs: {a: 1, b: 2}, expected: 3},
{inputs: {a: 2, b: 3}, expected: 5},
{inputs: {a: 3, b: 4}, expected: 7},
];
// OpenAI を使用したモデルロジックの例
const userModel = weave.op(async function userModel(a: number, b: number): Promise {
const oai = new OpenAI();
const response = await oai.chat.completions.create({
messages: [{role: 'user', content: `What is ${a}+${b}?`}],
model: 'gpt-4o-mini'
});
return a + b;
});
// 例を反復処理し、fire-and-forget パターンを使って予測とログを行う
for (const sample of evalSamples) {
const {inputs} = sample;
const modelOutput = await userModel(inputs.a, inputs.b);
// Fire-and-forget: logPrediction に await は不要
const prediction = evalLogger.logPrediction(inputs, modelOutput);
// この予測のスコアを計算してログする
const correctnessScore = modelOutput === sample.expected;
// Fire-and-forget: logScore に await は不要
prediction.logScore('correctness', correctnessScore);
// Fire-and-forget: finish に await は不要
prediction.finish();
}
// logSummary は内部で保留中のすべての処理が完了するまで待機する
const summaryStats = {subjective_overall_score: 0.8};
await evalLogger.logSummary(summaryStats);
console.log('Evaluation logging complete. View results in the Weave UI.');
```
各操作が完了してから次に進む必要がある場合、たとえばエラー処理や順次依存する処理を扱うときは、await 可能な API を使用します。
次の例では、`logPrediction()` を `await` なしで呼び出す代わりに、`await` を付けて `logPredictionAsync()` を使用し、各操作が完了してから次の操作に進むようにしています。
```typescript twoslash lines theme={null}
// @noErrors
// logPrediction の代わりに logPredictionAsync を使用する
const prediction = await evalLogger.logPredictionAsync(inputs, modelOutput);
// 各操作を await する
await prediction.logScore('correctness', correctnessScore);
await prediction.finish();
```
## `log_example()` を使用した簡易ログ記録
`log_example()` を使用すると、入力、1 つの出力、スコアを 1 回の Call でログできます。この便利なメソッドは、`log_prediction()`、`log_score()`、`finish()` を 1 つのステップにまとめたものです。バッチ評価やオフライン評価のように、ログする入力、モデル出力、スコアがすでにそろっている場合に便利です。
```python lines theme={null}
import weave
from weave import EvaluationLogger
weave.init('[YOUR-TEAM]/[YOUR-PROJECT]')
eval_logger = EvaluationLogger(
model="my_model",
dataset="my_dataset"
)
eval_samples = [
{'inputs': {'a': 1, 'b': 2}, 'expected': 3},
{'inputs': {'a': 2, 'b': 3}, 'expected': 5},
{'inputs': {'a': 3, 'b': 4}, 'expected': 7},
]
for sample in eval_samples:
inputs = sample['inputs']
output = inputs['a'] + inputs['b']
eval_logger.log_example(
inputs=inputs,
output=output,
scores={"correctness": output == sample['expected']}
)
eval_logger.log_summary({"avg_score": 1.0})
```
前の `log_example()` Call は、次と同等です:
```python lines theme={null}
prediction = eval_logger.log_prediction(inputs=inputs, output=output)
prediction.log_score(scorer="correctness", score=output == sample['expected'])
prediction.finish()
```
Weave TypeScript SDK では `log_example()` は使用できません。TypeScript ユーザーは、[基本例](#basic-example) に示されている `logPrediction()` と `logScore()` のパターンを使用してください。
## 高度な使い方
`EvaluationLogger` は、基本的なワークフローを超えて、より複雑な評価シナリオに対応できる柔軟なパターンを提供します。以下のセクションでは、コンテキストマネージャーを使った自動的なリソース管理、エージェントのトレースと評価行のリンク、モデル実行とログすることの分離、リッチメディアデータの活用、複数のモデル評価の比較表示などの高度な手法を紹介します。
### コンテキストマネージャーを使用する
`EvaluationLogger` は、予測とスコアの両方でコンテキストマネージャー (`with` 文) をサポートしています。これにより、コードをより簡潔に保ち、リソースを自動的にクリーンアップし、LLM judge Call のようなネストされた操作をより適切にトラッキングできます。
このコンテキストで `with` 文を使用する主な利点は次のとおりです。
* コンテキストを抜ける際に `finish()` が自動的に呼び出される。
* ネストされた LLM Call の token と cost の tracking が向上する。
* prediction コンテキスト内で、モデル実行後に output を設定できる。
```python lines {16,24,31,40} theme={null}
import openai
import weave
weave.init("nested-evaluation-example")
oai = openai.OpenAI()
# ロガー を初期化します
ev = weave.EvaluationLogger(
model="gpt-4o-mini",
dataset="joke_dataset"
)
user_prompt = "Tell me a joke"
# prediction ではコンテキストマネージャーを使用するため、finish() を呼び出す必要はありません
with ev.log_prediction(inputs={"user_prompt": user_prompt}) as prediction:
# コンテキスト内でモデル呼び出しを実行します
result = oai.chat.completions.create(
model="gpt-4o-mini",
messages=[{"role": "user", "content": user_prompt}],
)
# モデル呼び出し後に output を設定します
prediction.output = result.choices[0].message.content
# 単純なスコアをログします
prediction.log_score("correctness", 1.0)
prediction.log_score("ambiguity", 0.3)
# LLM Call が必要なスコアでは、ネストされたコンテキストマネージャーを使用します
with prediction.log_score("llm_judge") as score:
judge_result = oai.chat.completions.create(
model="gpt-4o-mini",
messages=[
{"role": "system", "content": "Rate how funny the joke is from 1-5"},
{"role": "user", "content": prediction.output},
],
)
# 計算後にスコア値を設定します
score.value = judge_result.choices[0].message.content
# 'with' ブロックを抜けると finish() が自動的に呼び出されます
ev.log_summary({"avg_score": 1.0})
```
このパターンにより、ネストされたすべての操作が親 prediction にひも付けられてトラッキングされるため、Weave UI で正確なトークン使用量 と cost data を確認できます。
TypeScript には、コンテキストマネージャー向けの Python の `with` 文のようなパターンはありません。代わりに、`finish()` を明示的に呼び出す fire-and-forget パターンを使用します。
次の例では、prediction をログし、スコアと LLM judge score を追加した後、`finish()` で prediction を完了します。
```typescript twoslash lines {43} theme={null}
// @noErrors
import weave from 'weave';
import OpenAI from 'openai';
import {EvaluationLogger} from 'weave/evaluationLogger';
await weave.init('[YOUR-TEAM]/[YOUR-PROJECT]');
const oai = new OpenAI();
// ロガー を初期化します
const ev = new EvaluationLogger({
name: 'joke-eval',
model: 'gpt-4o-mini',
dataset: 'joke_dataset',
});
const userPrompt = 'Tell me a joke';
// モデル出力を取得します
const result = await oai.chat.completions.create({
model: 'gpt-4o-mini',
messages: [{role: 'user', content: userPrompt}],
});
const modelOutput = result.choices[0].message.content;
// output 付きで prediction をログします
const prediction = ev.logPrediction({user_prompt: userPrompt}, modelOutput);
// 単純なスコアをログします
prediction.logScore('correctness', 1.0);
prediction.logScore('ambiguity', 0.3);
// LLM judge score については、呼び出しを行って結果をログします
const judgeResult = await oai.chat.completions.create({
model: 'gpt-4o-mini',
messages: [
{role: 'system', content: 'Rate how funny the joke is from 1-5'},
{role: 'user', content: modelOutput || ''},
],
});
prediction.logScore('llm_judge', judgeResult.choices[0].message.content);
// スコアの記録が完了したら、finish を明示的に呼び出します
prediction.finish();
await ev.logSummary({avg_score: 1.0});
```
TypeScript にはコンテキストマネージャーによる自動クリーンアップはありませんが、`logSummary()` は結果を集計する前に、未完了の prediction を自動的に finish します。`finish()` を明示的に呼び出したくない場合は、この動作に任せることもできます。
### エージェント トレースを評価にリンクする
Python では、トレースする各エージェント Call を `log_prediction()` コンテキスト内で実行します。`EvaluationLogger` は、そのコンテキスト内で作成されたスパンに評価 run、例、試行のメタデータを設定します。Weave はこのメタデータを使用して、トレースを評価結果にリンクします。
評価とエージェント スパンの自動リンクは Python でのみ利用できます。TypeScript の `EvaluationLogger` と `Evaluation.evaluate()` は、エージェント スパンにリンクするアクティブな評価スコープを作成しません。TypeScript では、このセクションで説明する OTel 属性をスパンに直接設定することでのみリンクできます。また、両方の Call ID がすでに利用可能である必要があります。
次の例では、[OpenAI Agents SDK](../integrations/agents/openai-agents-sdk) を使用します。同じパターンは、Weave がトレースする他のエージェント フレームワークにも適用できます。`[YOUR-TEAM]/[YOUR-PROJECT]` は、W\&B の entity と project に置き換えてください。
```python lines {18-28} theme={null}
import weave
from agents import Agent, Runner
from weave import EvaluationLogger
weave.init("[YOUR-TEAM]/[YOUR-PROJECT]")
agent = Agent(
name="Support agent",
instructions="Answer with only the city name.",
)
eval_logger = EvaluationLogger(
name="support-agent-eval",
model="support-agent",
dataset="support-prompts",
)
question = "What is the capital of France?"
with eval_logger.log_prediction(
inputs={"prompt": question},
example_id="capital-of-france",
) as prediction:
result = Runner.run_sync(agent, question)
output = str(result.final_output or "")
prediction.output = output
prediction.log_score(
scorer="contains_expected_answer",
score="paris" in output.lower(),
)
eval_logger.log_summary()
```
この機能は TypeScript では利用できません。
エージェントが予測コンテキストの開始前または終了後に実行された場合、Weave はトレースを記録しますが、評価結果にはリンクしません。
前述のコード例のように、エージェントが `log_prediction()` コンテキスト内で実行され、Weave インテグレーションによってトレースされる場合、Weave はトレースを評価結果に自動的にリンクします。それ以外の場合は、エージェント スパンに 2 つのリンク用 ID を自分で設定します。設定方法は、スパンが作成される場所によって異なります。
* **同じプロセス内で独自にインストルメンテーションする場合:** 各スパンに属性を直接設定します。
* **別のサービスの場合:** 両方の ID をそのサービスに送信し、そのサービスが作成するスパンに設定します。
#### 自分でインストルメントしたスパンをリンクする
`log_prediction()` コンテキスト内でスパンが作成された場合、`EvaluationLogger` はすべての属性を自動的に設定します。ただし、独自の OpenTelemetry (OTel) インストルメンテーションでスパンを送信する場合は、リンクする各スパンに属性を直接設定する必要があります。評価では、次の属性を設定できます。
| 属性 | タイプ | 説明 |
| -------------------------------------- | ------- | ------------------------------------------------------------------------------------------------------------- |
| `weave.eval.run_id` | string | (必須) 評価 run (`Evaluation.evaluate`) の Call ID。評価レベルの **スパンを表示** の結果にスパンを含めるために必要です。 |
| `weave.eval.predict_and_score_call_id` | string | (必須) 特定の結果と試行に対応する `Evaluation.predict_and_score` 操作の Call ID。`weave.eval.run_id` と併せて設定すると、スパンがその結果にリンクされます。 |
| `weave.eval.kind` | string | (省略可) 評価のカテゴリ。Weave では、エージェント評価に `agent`、標準評価に `standard` を使用します。 |
| `weave.eval.row_digest` | string | (省略可) 評価対象のデータセット行を識別する安定したダイジェスト。値を指定しない場合、`EvaluationLogger` が予測入力からこの値を導出します。 |
| `weave.eval.example_id` | string | (省略可) 評価対象の例に対して呼び出し元が指定する識別子。 |
| `weave.eval.trial_index` | integer | (省略可) データセット行の 0 始まりの試行番号。 |
| `weave.eval.evaluation_name` | string | (省略可) 人間が理解しやすい評価名。 |
| `weave.eval.project_id` | string | (省略可) Weave SDK により設定される project コンテキスト。この属性ではスパンのルーティングやリンクは行われません。代わりに、OTel リソースで送信先の project を設定してください。 |
`/agents/otel/v1/traces` エンドポイントを通じて、評価と同じ Weave プロジェクトにスパンを送信します。OTel スパン属性は親スパンから子スパンに伝播しないため、リンクするすべてのスパンに属性を設定してください。
エンドポイントの詳細については、次を参照してください。
* 既存の OTel パイプラインからスパンを送信する方法については、[OpenTelemetry スパンを Agents ビューに送信する](/ja/weave/guides/tracking/trace-agents-otel)を参照してください。
* エンドポイントの仕様については、[GenAI トレースをエクスポートする](/ja/weave/reference/service-api/agents/export-genai-trace)を参照してください。
評価と結果のリンクを確立するのは、`weave.eval.run_id` と `weave.eval.predict_and_score_call_id` のみです。行ダイジェスト、例 ID、試行インデックス、kind、評価名はコンテキストの追加やフィルタリングに使用できますが、それ自体ではリンクを作成しません。2 つのリンク属性には、OTel のトレース ID やスパン ID ではなく、Weave Call ID を使用してください。
両方の ID は、[評価結果クエリ API](/ja/weave/reference/service-api/eval-results/eval-results-query)から取得できます。レスポンスの各評価には `evaluation_call_id` があり、各試行には `predict_and_score_call_id` があります。
次の例では、`span` がエージェント操作の OTel スパンであることを前提としています。各角括弧内の値を、スパンが属する評価 run と結果のメタデータに置き換えてください。
TypeScript の例では、予測スコープに依存せず、OTel 属性を直接設定します。両方の Call ID をすでに取得している場合にのみ使用してください。
```python lines theme={null}
span.set_attributes(
{
"weave.eval.run_id": "[EVALUATION-RUN-CALL-ID]",
"weave.eval.predict_and_score_call_id": "[PREDICT-AND-SCORE-CALL-ID]",
"weave.eval.kind": "agent",
"weave.eval.row_digest": "[ROW-DIGEST]",
"weave.eval.example_id": "[EXAMPLE-ID]",
"weave.eval.trial_index": 0,
"weave.eval.evaluation_name": "[EVALUATION-NAME]",
}
)
```
```typescript lines theme={null}
span.setAttributes({
'weave.eval.run_id': '[EVALUATION-RUN-CALL-ID]',
'weave.eval.predict_and_score_call_id': '[PREDICT-AND-SCORE-CALL-ID]',
'weave.eval.kind': 'agent',
'weave.eval.row_digest': '[ROW-DIGEST]',
'weave.eval.example_id': '[EXAMPLE-ID]',
'weave.eval.trial_index': 0,
'weave.eval.evaluation_name': '[EVALUATION-NAME]',
});
```
#### 別のサービスで実行されるエージェントをリンクする
エージェントを別のサービスとして実行する場合、評価プロセスとエージェントはメモリを共有しません。Weave はリンク用の属性を自動的に設定できず、エージェントのスパンオブジェクトに直接アクセスすることもできません。代わりに、評価プロセスで両方の Call ID を取得してサービスに送信し、サービス側で作成されるスパンに設定します。この分散 `EvaluationLogger` パターンは Python でのみ使用できます。
`log_prediction()` のコンテキストに入ると、コンテキスト本体の実行前に `Evaluation.predict_and_score` Call が作成されます。このコンテキストは、両方の Call ID を公開する `ScoreLogger` (次の例では `prediction` にバインド) を返します。同じ評価結果にサービスの出力とスコアをログできるよう、サービスから応答が返るまでコンテキストを開いたままにします。
評価プロセスで、`[AGENT-SERVICE-URL]` をエージェントを実行するエンドポイントに置き換え、`[YOUR-TEAM]/[YOUR-PROJECT]` も置き換えます。
```python lines {16-37} theme={null}
import requests
import weave
from weave import EvaluationLogger
weave.init("[YOUR-TEAM]/[YOUR-PROJECT]")
eval_logger = EvaluationLogger(
name="support-agent-eval",
model="support-agent",
dataset="support-prompts",
)
question = "What is the capital of France?"
example_id = "capital-of-france"
trial_index = 0
with eval_logger.log_prediction(
inputs={"prompt": question},
example_id=example_id,
trial_index=trial_index,
) as prediction:
eval_context = {
"weave.eval.run_id": prediction.evaluate_call.id,
"weave.eval.predict_and_score_call_id": (
prediction.predict_and_score_call.id
),
"weave.eval.kind": "agent",
"weave.eval.example_id": example_id,
"weave.eval.trial_index": trial_index,
"weave.eval.evaluation_name": "support-agent-eval",
}
response = requests.post(
"[AGENT-SERVICE-URL]",
json={"prompt": question, "eval_context": eval_context},
timeout=60,
)
response.raise_for_status()
prediction.output = response.json()["output"]
eval_logger.log_summary()
```
エージェントサービスでは、受信した属性を、結果に関連付けるすべてのエージェントスパンにコピーします。次の関数は、生の OTel スパンを使用した受信側の実装例です。評価と同じ `[YOUR-TEAM]/[YOUR-PROJECT]` にスパンをエクスポートするようサービスを設定します。
```python lines {16,22} theme={null}
from typing import Any
import weave
from agents import Agent, Runner
from opentelemetry import trace
weave.init("[YOUR-TEAM]/[YOUR-PROJECT]")
tracer = trace.get_tracer(__name__)
agent = Agent(
name="Support agent",
instructions="Answer with only the city name.",
)
def run_agent(request_body: dict[str, Any]) -> dict[str, str]:
eval_context = request_body["eval_context"]
with tracer.start_as_current_span(
"invoke_agent Support agent",
attributes={
"gen_ai.operation.name": "invoke_agent",
"gen_ai.agent.name": "Support agent",
**eval_context,
},
):
result = Runner.run_sync(agent, request_body["prompt"])
return {"output": str(result.final_output or "")}
```
この例のラッパースパンは評価結果にリンクされます。エージェントフレームワークによって追加のスパンが作成される場合は、それらのスパンにも `eval_context` をコピーします。OTel はラッパースパンからスパン属性を継承しません。
この機能は TypeScript では使用できません。
#### 評価からリンクされたエージェント スパンを表示する
Weave UI でリンクされたスパンを確認するには、次の手順を実行します。
1. [wandb.ai](https://wandb.ai) にアクセスします。
2. Weave のサイドバーメニューで **Evals** をクリックします。
3. 評価 run を選択します。
4. 開いた評価の詳細パネルで、**Evaluation** タブの **View spans** をクリックします。**Agents** ページが開き、**Spans** タブにはその評価でフィルターされたスパンが表示されます。
### 既存のデータセットにリンクする
生のデータセットを `log_prediction` に `inputs` として渡すと、Weave は評価の run ごとにデータを再インポートします。そのため重複データが保存され、データセットが大きい場合や、多数の評価で再利用する場合には容量の無駄になることがあります。
この重複を避けるには、評価を実行する前にデータセットを Weave に公開し、その公開済みデータセットの行を `inputs` として渡してください。Weave はデータを再インポートする代わりに、公開済みの行への参照を内部参照として解決します。これにより、標準の Evaluation フレームワークと同様に、各予測が Weave UI 内の特定のデータセット行にリンクされるようになります。
次の例では、データセットを公開して `EvaluationLogger` でそれにリンクし、他のデータセットと同様に取得して反復処理します。
```python lines theme={null}
import weave
from weave import EvaluationLogger
weave.init("[YOUR-TEAM]/[YOUR-PROJECT]")
# データセットを公開します(必要なのは一度だけです)
dataset = weave.Dataset(
name="my_eval_dataset",
rows=[
{"question": "What is the capital of France?", "expected": "Paris"},
{"question": "What U.S. state is Seattle in?", "expected": "Washington"},
{"question": "In which country is Mount Fuji?", "expected": "Japan"},
],
)
weave.publish(dataset)
# 公開済みデータセットを取得します
dataset = weave.ref("my_eval_dataset").get()
```
```typescript twoslash lines theme={null}
// @noErrors
import weave, {EvaluationLogger, Dataset} from 'weave';
await weave.init('[YOUR-TEAM]/[YOUR-PROJECT]');
// データセットを公開します(必要なのは一度だけです)
const dataset = new Dataset({
name: 'my_eval_dataset',
rows: [
{"question": "What is the capital of France?", "expected": "Paris"},
{"question": "What U.S. state is Seattle in?", "expected": "Washington"},
{"question": "In which country is Mount Fuji?", "expected": "Japan"},
],
});
const datasetRef = await dataset.save();
// 公開済みデータセットを取得します
const published = await datasetRef.get();
```
### ログする前に出力を取得する
まずモデルの出力を計算し、その後で予測とスコアを個別にログできます。これにより、評価ロジックとロギングロジックが分離され、システムの異なる部分で予測生成とスコアリングを処理する場合に、コードのテストや保守がしやすくなります。
```python lines theme={null}
# トークン トラッキング を確実に行うため、モデルを呼び出す前に EvaluationLogger を初期化します
ev = EvaluationLogger(
model="example_model",
dataset="example_dataset"
)
# トークン トラッキング のため、モデル出力(例: OpenAI への Call)はロガーの初期化後に実行する必要があります
outputs = [your_output_generator(**inputs) for inputs in your_dataset]
predictions = [ev.log_prediction(inputs, output) for inputs, output in zip(your_dataset, outputs)]
for prediction, output in zip(predictions, outputs):
prediction.log_score(scorer="greater_than_5_scorer", score=output > 5)
prediction.log_score(scorer="greater_than_7_scorer", score=output > 7)
prediction.finish()
ev.log_summary()
```
複数の予測を並列で処理する場合、fire-and-forget パターンは特に効果的です。
次の例では、`EvaluationLogger` の複数の同時インスタンスを作成して、評価を並列にバッチ処理します。
```typescript twoslash lines theme={null}
// @noErrors
// トークン トラッキング を確実に行うため、モデルを呼び出す前に EvaluationLogger を初期化します
const ev = new EvaluationLogger({
name: 'parallel-eval',
model: 'example_model',
dataset: 'example_dataset'
});
// トークン トラッキング のため、OpenAI への Call などのモデル出力はロガーの初期化後に実行する必要があります
const outputs = await Promise.all(
yourDataset.map(inputs => yourOutputGenerator(inputs))
);
// fire-and-forget: await せずにすべての予測を処理します
const predictions = yourDataset.map((inputs, i) =>
ev.logPrediction(inputs, outputs[i])
);
predictions.forEach((prediction, i) => {
const output = outputs[i];
// fire-and-forget: await は不要です
prediction.logScore('greater_than_5_scorer', output > 5);
prediction.logScore('greater_than_7_scorer', output > 7);
prediction.finish();
});
// logSummary は保留中のすべての操作が完了するまで待機します
await ev.logSummary();
```
fire-and-forget パターンを使用すると、計算リソースが許す限り多くの評価を並列に処理できます。
### リッチメディアをログする
入力、出力、スコアには、画像、動画、オーディオ、構造化された表データなどのリッチメディアを含めることができます。リッチメディアをログすると、Weave UI でスコアと並べて実際の内容を確認できるため、マルチモーダルモデルの定性的な分析に役立ちます。`log_prediction` または `log_score` メソッドに dict またはメディアオブジェクトを渡すだけです。
```python lines theme={null}
import io
import wave
import struct
from PIL import Image
import random
from typing import Any
import weave
def generate_random_audio_wave_read(duration=2, sample_rate=44100):
n_samples = duration * sample_rate
amplitude = 32767 # 16 ビットの最大振幅
buffer = io.BytesIO()
# バッファに wave データを書き込む
with wave.open(buffer, 'wb') as wf:
wf.setnchannels(1)
wf.setsampwidth(2) # 16 ビット
wf.setframerate(sample_rate)
for _ in range(n_samples):
sample = random.randint(-amplitude, amplitude)
wf.writeframes(struct.pack(' dict[str, Any]:
return {
"result": random.randint(0, 10),
"image": image,
"audio": audio,
}
ev = EvaluationLogger(model="example_model", dataset="example_dataset")
for inputs in rich_media_dataset:
output = your_output_generator(**inputs)
prediction = ev.log_prediction(inputs, output)
prediction.log_score(scorer="greater_than_5_scorer", score=output["result"] > 5)
prediction.log_score(scorer="greater_than_7_scorer", score=output["result"] > 7)
ev.log_summary()
```
TypeScript SDK では、`weaveImage` 関数と `weaveAudio` 関数を使用して画像とオーディオをログできます。次の例では、画像ファイルとオーディオファイルを読み込み、モデルで処理し、スコア付きで結果をログします。
```typescript twoslash lines theme={null}
// @noErrors
import weave, {EvaluationLogger} from 'weave';
import * as fs from 'fs';
await weave.init('[YOUR-TEAM]/[YOUR-PROJECT]');
// ファイルから画像とオーディオを読み込む
const richMediaDataset = [
{
image: weave.weaveImage({data: fs.readFileSync('sample1.png')}),
audio: weave.weaveAudio({data: fs.readFileSync('sample1.wav')}),
},
{
image: weave.weaveImage({data: fs.readFileSync('sample2.png')}),
audio: weave.weaveAudio({data: fs.readFileSync('sample2.wav')}),
},
];
// メディアを処理して結果を返すモデル
const yourOutputGenerator = weave.op(
async (inputs: {image: any; audio: any}) => {
const result = Math.floor(Math.random() * 10);
return {
result,
image: inputs.image,
audio: inputs.audio,
};
},
{name: 'yourOutputGenerator'}
);
const ev = new EvaluationLogger({
name: 'rich-media-eval',
model: 'example_model',
dataset: 'example_dataset',
});
for (const inputs of richMediaDataset) {
const output = await yourOutputGenerator(inputs);
// 入力と出力の両方にリッチメディアを含めて予測をログする
const prediction = ev.logPrediction(inputs, output);
prediction.logScore('greater_than_5_scorer', output.result > 5);
prediction.logScore('greater_than_7_scorer', output.result > 7);
prediction.finish();
}
await ev.logSummary();
```
### 複数の評価をログして比較する
`EvaluationLogger` を使用すると、複数の評価をログして Weave UI で並べて比較できます。これは、同じデータセットに対して異なるモデルがどのように機能するかを評価する際に役立ちます。
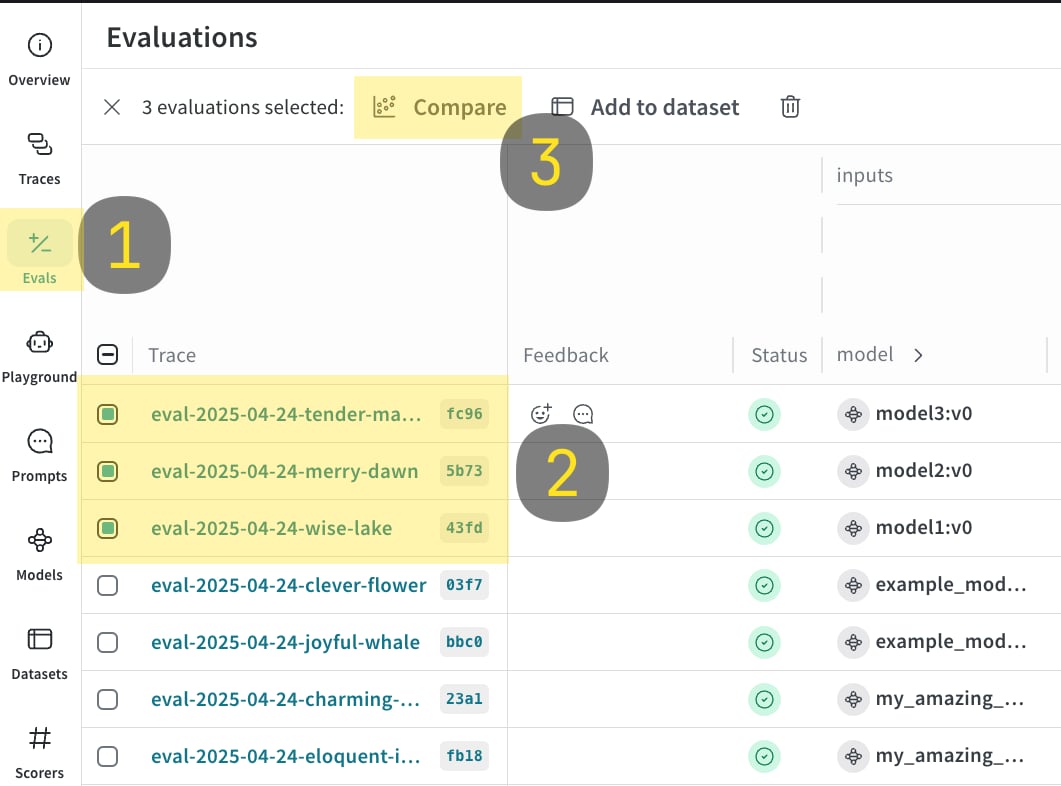
1. 以下のコードサンプルを実行します。
2. Weave UI で **Evals** タブを開きます。
3. 比較したい評価を選択します。
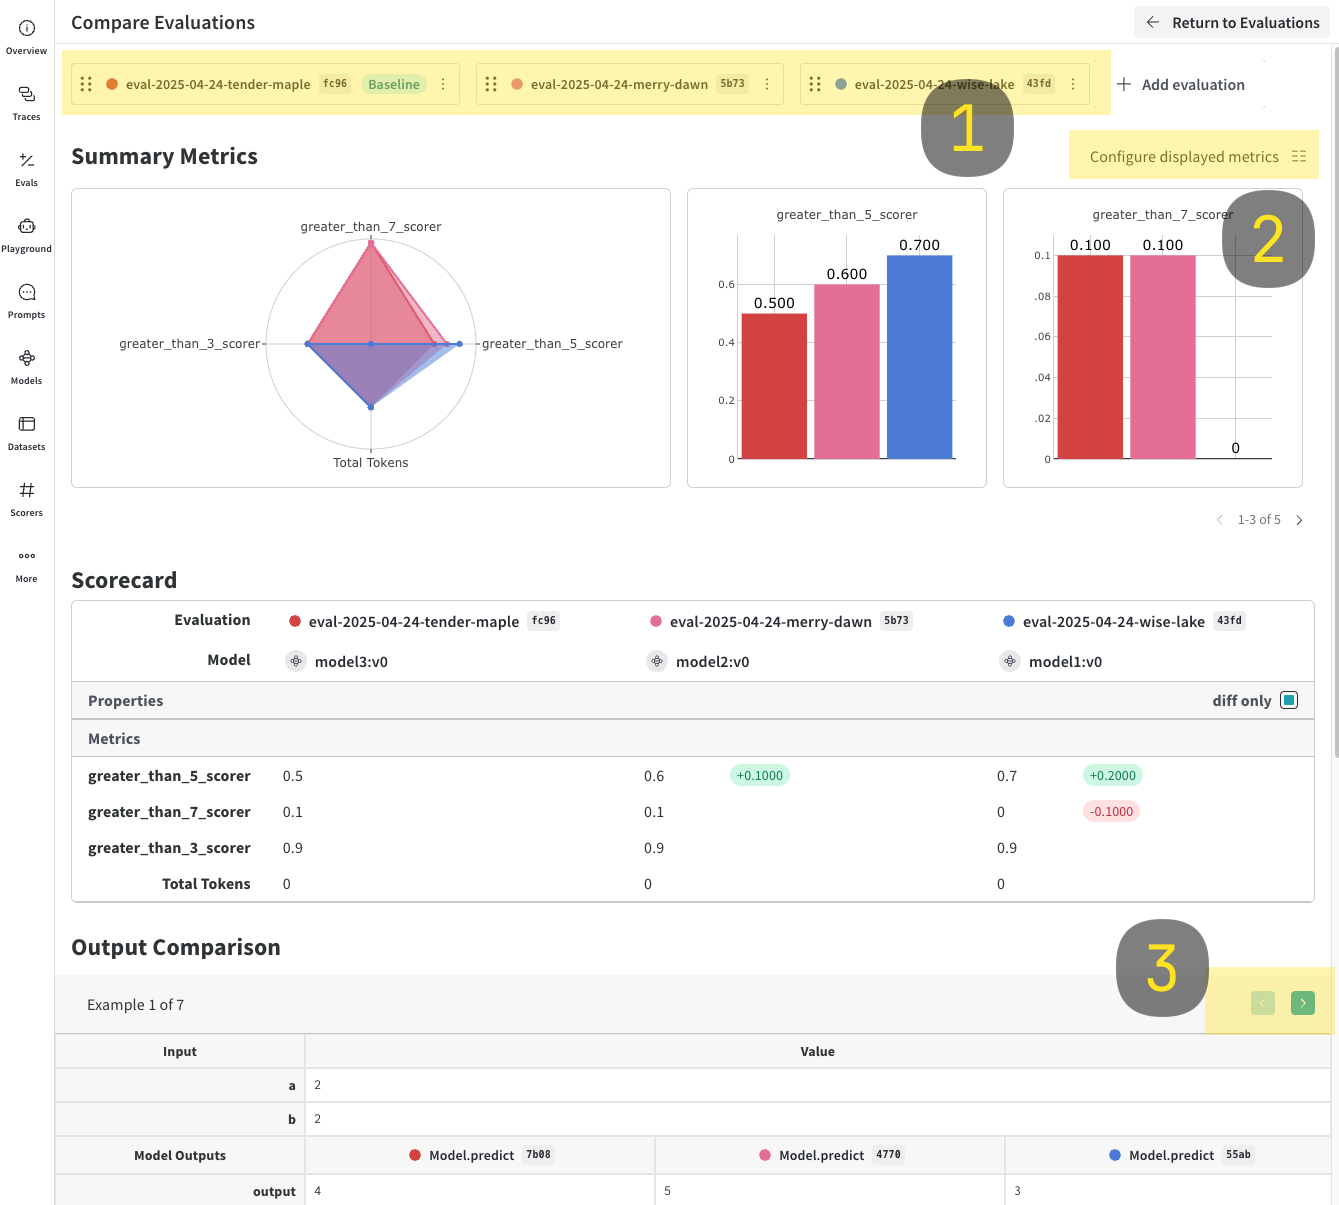
4. **Compare** をクリックします。Compare ビューでは、次のことができます。
* 追加または削除する評価を選択する。
* 表示または非表示にするメトリクスを選択する。
* 特定の例をページで切り替えながら、同じデータセット内の同じ入力に対して各モデルがどのような結果を返したかを確認する。
比較の詳細については、[Comparisons](../tools/comparison) を参照してください。
```python lines theme={null}
import weave
models = [
"model1",
"model2",
{"name": "model3", "metadata": {"coolness": 9001}}
]
for model in models:
# トークンを取得するには、モデル Call の前に EvaluationLogger を初期化する必要があります
ev = EvaluationLogger(
name="comparison-eval",
model=model,
dataset="example_dataset",
scorers=["greater_than_3_scorer", "greater_than_5_scorer", "greater_than_7_scorer"],
eval_attributes={"experiment_id": "exp_123"}
)
for inputs in your_dataset:
output = your_output_generator(**inputs)
prediction = ev.log_prediction(inputs=inputs, output=output)
prediction.log_score(scorer="greater_than_3_scorer", score=output > 3)
prediction.log_score(scorer="greater_than_5_scorer", score=output > 5)
prediction.log_score(scorer="greater_than_7_scorer", score=output > 7)
prediction.finish()
ev.log_summary()
```
```typescript twoslash lines theme={null}
// @noErrors
import weave from 'weave';
import {EvaluationLogger} from 'weave/evaluationLogger';
import {WeaveObject} from 'weave/weaveObject';
await weave.init('[YOUR-TEAM]/[YOUR-PROJECT]');
const models = [
'model1',
'model2',
new WeaveObject({name: 'model3', metadata: {coolness: 9001}})
];
for (const model of models) {
// トークンを取得するには、モデル Call の前に EvaluationLogger を初期化する必要があります
const ev = new EvaluationLogger({
name: 'comparison-eval',
model: model,
dataset: 'example_dataset',
description: 'Model comparison evaluation',
scorers: ['greater_than_3_scorer', 'greater_than_5_scorer', 'greater_than_7_scorer'],
attributes: {experiment_id: 'exp_123'}
});
for (const inputs of yourDataset) {
const output = await yourOutputGenerator(inputs);
// クリーンで効率的なロギングのための Fire-and-forget パターン
const prediction = ev.logPrediction(inputs, output);
prediction.logScore('greater_than_3_scorer', output > 3);
prediction.logScore('greater_than_5_scorer', output > 5);
prediction.logScore('greater_than_5_scorer', output > 5);
prediction.logScore('greater_than_7_scorer', output > 7);
prediction.finish();
}
await ev.logSummary();
}
```
## 使用上のヒント
以下のヒントは、`EvaluationLogger` を最大限に活用するのに役立ちます。
* 各予測の後は、すぐに `finish()` を呼び出してください。
* `log_summary` を使用して、個々の予測に紐づかないメトリクス (たとえば、全体のレイテンシ) を記録します。
* リッチメディアのログ記録は、定性的な分析に最適です。
* **自動終了の動作**: わかりやすくするため、各予測で `finish()` を明示的に呼び出してください。`logSummary()` は未終了の予測を自動的に終了します。ただし、`finish()` を呼び出した後は、その予測のスコアをそれ以上ログできません。
* **設定オプション**: `name`、`description`、`dataset`、`model`、`scorers`、`attributes` などの設定オプションを使用すると、Weave UI で評価を整理してフィルターできます。